The second day’s post of Mercari Advent Calendar 2019 is brought to you by @panini from the US@Tokyo Android team.
Goodbye Fabric, Hello Firebase 👋
As those of you using Fabric Crashlytics for crash reporting, or Fabric Beta for distributing builds to testers, Fabric will be deprecated on March 31, 2020. That means there is just over 1 quarter before we need to migrate our apps to Firebase 🙀
Thankfully, the migration to Firebase App Distribution is fairly painless, and all going to plan should take less than an hour to complete 🎉
Prerequisites
For starters, you will need to have a Firebase Project, and access to said project. If you don’t have direct access to Firebase, what you need is the app id from the Project settings page, and someone to enable App Distribution from the Quality tab, and generate an invite link for the distribution.
Next, we optionally want to set up Fastlane which is incredibly useful for automating app tasks. Installing Fastlane is slightly out of the scope for this blog, but there are many good blogs out there on how to do this.
Finally, we optionally also want to have a CI system from which to deploy our builds – this will mean that our builds are always built inside the same environment, and ensure that we can reduce the number of human errors caused when creating a build. This step is also outside the scope of this blog, but I can recommend either Bitrise or CircleCi as good options for mobile applications.
Setting up
Now that we have the prerequisites done, lets get on to the meat of the task! There are a few tasks we have to run through which I will go over here.
Firebase 🔥
First things first is to set up the Firebase CLI. As mentioned in the official documentation, the easiest way to do this, is to install it through NPM.
If you are using NPM for something else in your app (for example, ReactNative), then you can simply add "firebase-tools": "<latest version>" to your dependencies block, and install the dependency through your favorite method.
Next, we need to login to the Firebase CLI, to give the tool access to your Firebase project.
To do this, we can simply run the following from the command line:
$> firebase login
The tool will prompt you to login to the Google account that has access to the Firebase project you wish to access, so just follow the on screen steps, and it should be set up correctly.
To test the setup, you can call the following, which will list all available Firebase projects if set up correctly.
$> firebase list
Optional: CI login
If you are planning on uploading builds from a CI server, then you will need to generate a refresh token for the CI server to use. This can simply be done by calling the following:
$> firebase login:ci
Like the firebase login command, this will ask you to login to a Google account that has access to the Firebase project you wish to use, and then once you have finished the login it will print out a refresh token.
You should use this refresh token whenever calling Firebase commands from CI, so I recommend storing this in your CI setup as an environment secret. Note that anyone can access the Firebase project with this token, so be sure to keep it secret.
If you name the variable that holds the token FIREBASE_TOKEN, then the tool should automatically pick it up 💪
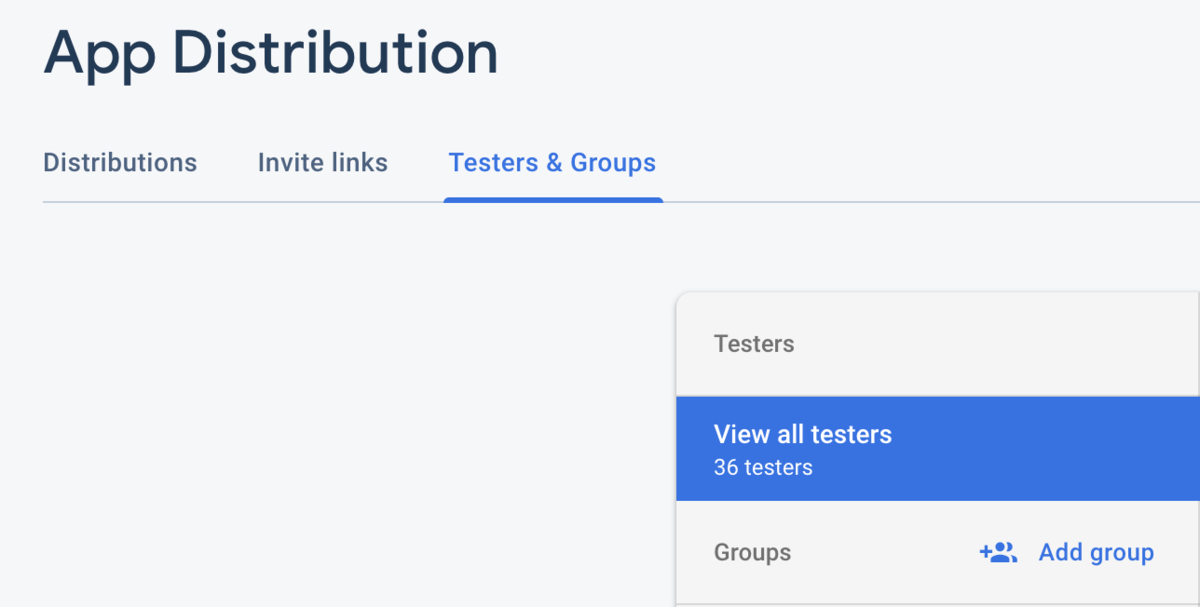
Setting up Tester groups
Finally, to finish our Firebase setup, we want to create a group of testers that we want to distribute our app to. This can be done from the Firebase console, on the App Distribution page.

From here, we want to create a new group – this can be done by clicking the Add Group button and following the steps. Make sure you keep this group name somewhere as we will require it later on in the upload process.
Fastlane 🚀 – optional
If you are using Fastlane in your app distribution pipeline, then you are in luck – there is a Fastlane plugin designed for working with the Firebase CLI that will do much of the heavy lifting for you!
By calling the following, you can add the firebase app distribution plugin to your Fastlane setup
$> fastlane add_plugin firebase_app_distribution
Next, we need to set up an environment variable for our app ID. The easiest way I found to do this was to create an .env file within your Fastlane directory.
If you have multiple environments (eg: for debug or release), you can specify that in the naming of the .env file:
fastlane/.env.default # the default environment
FIREBASEAPPDISTRO_APP=<debug Firebase app id>
fastlane/.env.release # release environment
FIREBASEAPPDISTRO_APP=<release Firebase app id>
Then, when driving a Fastlane lane, you can supply the --env release flag to use the release environment
Closing
Phew! The prerequisites and setup for Firebase App Distribution is finally done, so all that is left is to upload our build! Tune in tomorrow to see how to upload the build, and also to see some of the gotchas you might encounter when migrating.
Tomorrow, the third day’s post, is a continuation of this post from @panini. We hope you’ll enjoy it! 😸